
Managing Dataflow Gen2 across multiple environments (Development and Production) can be a headache. By default, the destination Lakehouse or Warehouse IDs are hardcoded. This means when you deploy to a Production workspace, your dataflow might still try to write back to your Development environment.
In this guide, I’ll show you a workaround to parameterize your destinations using the Variable Library and Git Integration, ensuring your data always lands in the correct environment automatically.
The Workflow Overview
The goal is to replace hardcoded Workspace and Lakehouse GUIDs with variables that update based on your environment. We will achieve this through a mix of Power Query and Fabric’s Git source control.
Step 1: Set Up Your Variable Library
To ensure your dataflow is portable between environments, you must define your environment-specific identifiers in the Varibale Libary before proceeding.
- Navigate to your Fabric Workspace.
- Go to your variable Library (Utilities folder)
- Add two new variables (if not already created):
workspace_ID andlakehouse_ID. - Input the specific GUIDs for your current environment as the default set, and use the GUIDs for the prd workspace as the alternative set.
Note: you can skip this step if already done.
Step 2: Create a Dynamic Query in Dataflow Gen2
Now, we need to bridge the gap between the Variable Library and the Dataflow.
- Open your Dataflow Gen2.
- Create a Blank Query press ok.
- Right click query and ensure Enable staging is disabled
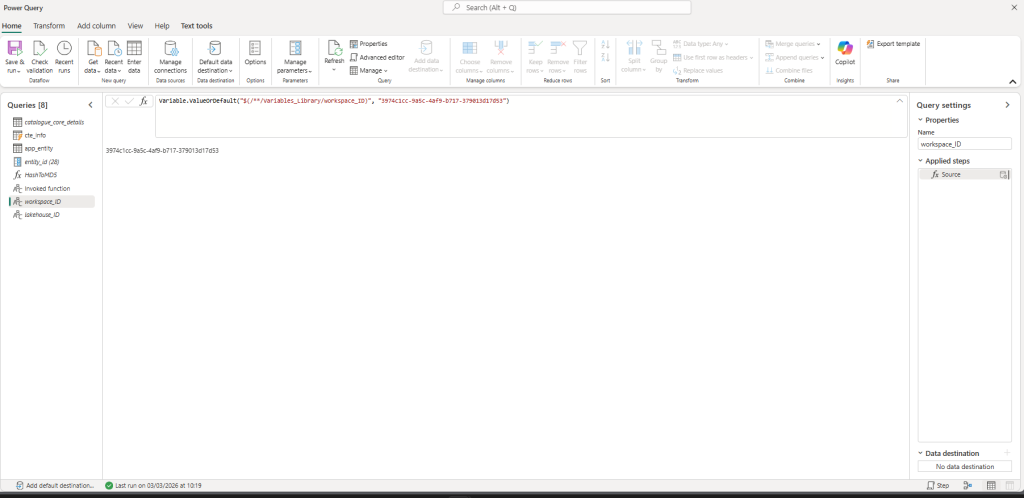
- Rename the query to lakehouse_ID
- In the formula bar paste the following
code:
Variable.ValueOrDefault("$(/**/Variables_Library/workspace_ID)", "default_value")Note: The second part (
"default_value") is essential. It acts as a fallback mechanism in case the Variable Library fails to fetch the ID during a refresh.
6. Repeat this for the lakehouse_ID.
7. Save and close your Dataflow.
Step 3: Commit to Source Control
For the “magic” to happen, we need to edit the underlying code that the Dataflow UI doesn’t normally let us touch.
- In the Fabric Workspace menu, click on the Source Control button.
- Select your Dataflow and click Commit. This pushes your Dataflow definition to your linked Git repository.
Step 4: Manually Update the Mashup.pq File
This is the core of the discovery. We are going to swap the hardcoded destination strings for our new variables.
- Go to your Git Repository (Azure DevOps).
- Locate the folder for your Dataflow and open the
mashup.pqfile. - Click Edit and scroll to the bottom of the script. You will see a section that looks like this:
Code snippet
shared catalogue_core_details_DataDestination = let
  Pattern = Lakehouse.Contents([HierarchicalNavigation = true, CreateNavigationProperties = false, EnableFolding = false]),
  Navigation_1 = Pattern{[workspaceId = "3974c1cc-9a5c-4af9-b717-379013d17d53"]}[Data],
  Navigation_2 = Navigation_1{[lakehouseId = "51c0e2fb-847d-492a-a22c-32aa3be4c7d0"]}[Data],
  Navigation_3 = Navigation_2{[Id = "util", ItemKind = "Schema"]}[Data],
  TableNavigation = Navigation_3{[Id = "catalogue_core_details_datamartview", ItemKind = "Table"]}?[Data]?
in
  TableNavigation;
- Replace the hardcoded GUIDs with your parameter names (e.g.,
workspace_ID andlakehouse_IDas defined in your queries):
it should now look like this
Code snippet
shared catalogue_core_details_DataDestination = let
  Pattern = Lakehouse.Contents([HierarchicalNavigation = true, CreateNavigationProperties = false, EnableFolding = false]),
  Navigation_1 = Pattern{[workspaceId = workspace_ID]}[Data],
  Navigation_2 = Navigation_1{[lakehouseId = lakehouse_ID]}[Data],
  Navigation_3 = Navigation_2{[Id = "util", ItemKind = "Schema"]}[Data],
  TableNavigation = Navigation_3{[Id = "catalogue_core_details_datamartview", ItemKind = "Table"]}?[Data]?
in
TableNavigation;- Commit these changes directly in the Git repo.
Step 5: Sync Back to Fabric
- Go back to your Fabric Workspace.
- Click the Source Control button again.
- You will see an indicator that there are changes in the repo. Click Update All.
- Fabric will now pull the parameterized code back into the workspace.
Step 6: Deploy to Production
Now you are ready to move your changes through the pipeline.
- Open your Deployment Pipeline.
- The pipeline should detect a difference between the Source (Dev) and Target (Prod).
- Click Deploy.
- Once the deployment finishes, navigate to your Production Workspace.
- Refresh the Dataflow, the data will flow into the Production Lakehouse instead of the Dev one.
Key Takeaways
- Dataflow Gen2 destinations are hardcoded by default
- Variable Libraries allow environment-specific configuration
- The destination must be updated in
mashup.pq - Source Control + Deployment Pipelines complete the release process
By parameterising the destination, Dataflows become fully environment-aware and safe to promote between workspaces.
Sources:
Variable references in Dataflow – Microsoft Fabric | Microsoft Learn
Use Fabric variable libraries in Dataflow Gen2 (Preview) – Microsoft Fabric | Microsoft Learn